>>
30-MINUTE MEALS! Get the email series now →


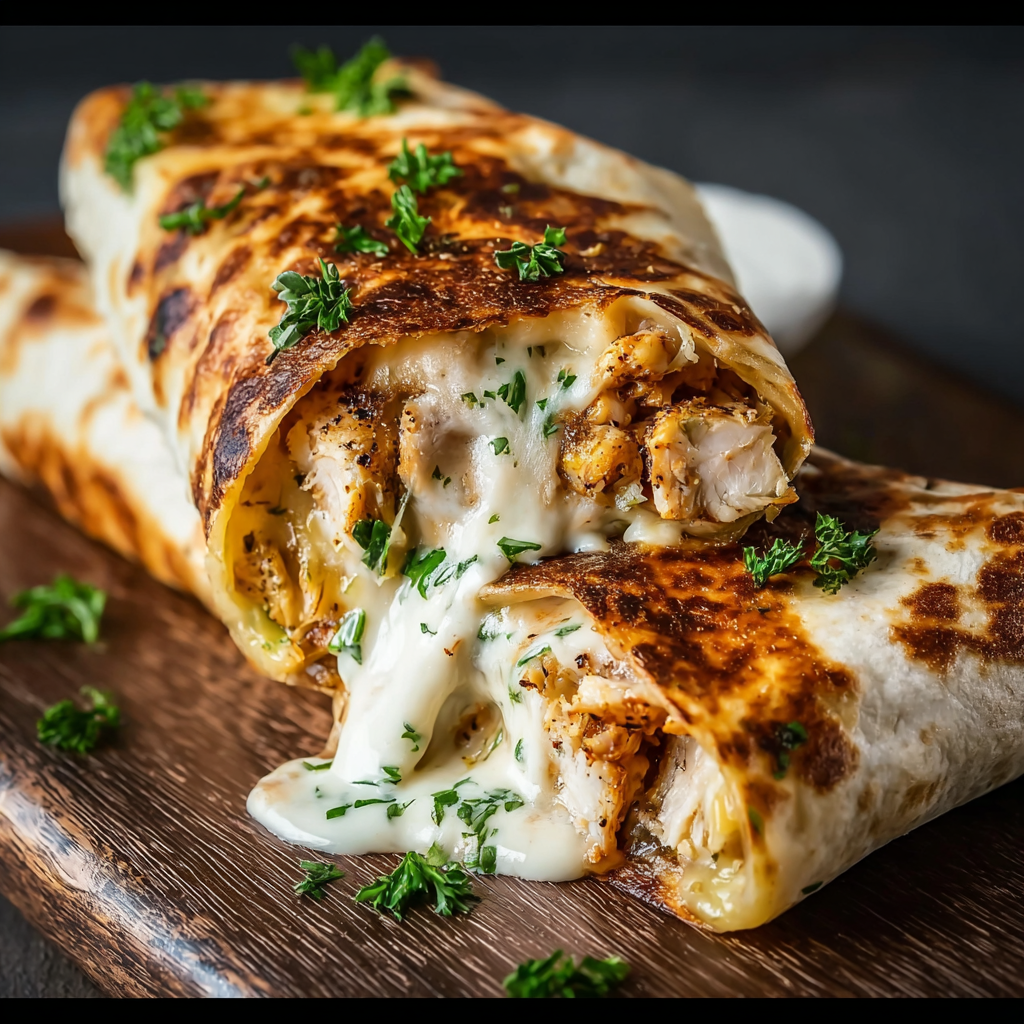
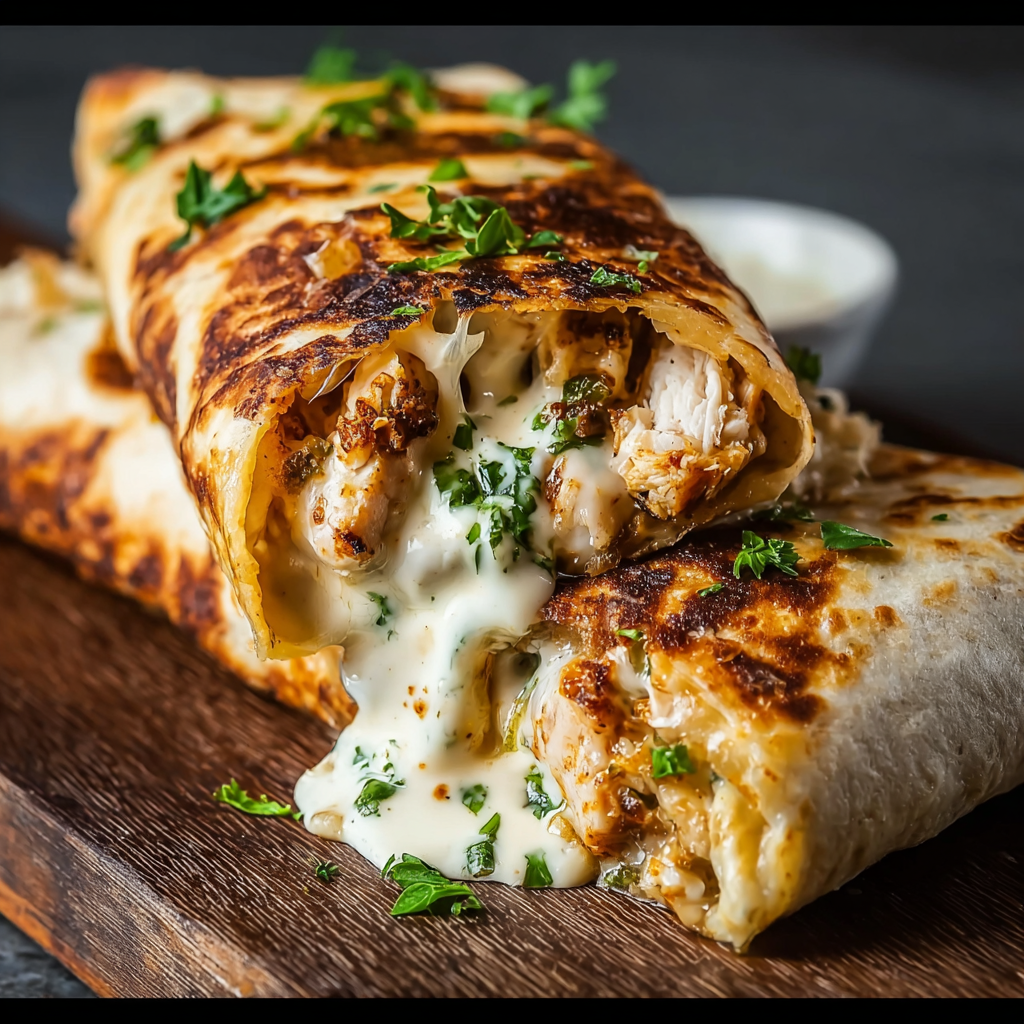
Warm, melty wraps stuffed with shredded chicken tossed in garlic aioli and sharp cheddar—an easy, crowd-pleasing meal ready in minutes.
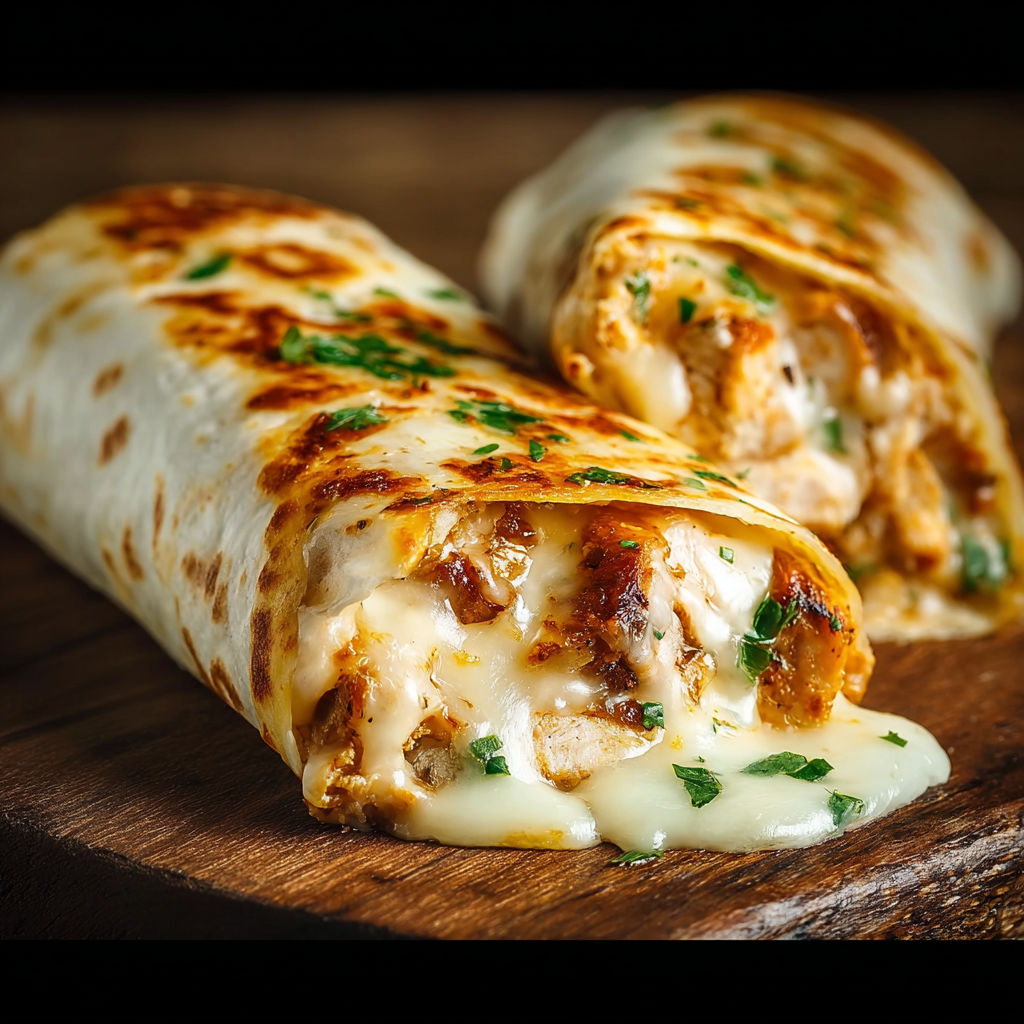
This recipe for Cheesy Garlic Chicken Wraps has been one of my most reliable weeknight solutions—comforting, fast, and endlessly adaptable. I first pulled this combination together on a busy Tuesday evening when I had leftover shredded chicken in the fridge and a craving for something warm and handheld. The garlic aioli brightened the chicken and the sharp cheddar created that irresistible pull when you bite into a warm tortilla. It quickly became a favorite in our house for nights when we wanted homemade without hours in the kitchen.
What makes these wraps special is the balance of texture and flavor: tender, seasoned chicken coated in creamy garlic aioli, the crisp, golden exterior from a quick skillet sear, and the gooey cheddar inside. They’re simple enough that even a rushed cook can achieve consistent results, and they travel well for lunches or picnics. Over time I’ve learned little tweaks—like pressing the tortilla in the skillet for a minute longer for extra crunch—that lift this from a quick bite to a comfort-food staple.
I remember serving these on a rainy evening when friends dropped by unexpectedly—people kept saying how cozy and satisfying they were. The mix of creamy aioli and nutty cheddar became a small revelation for one friend who never thought a simple tortilla could be so comforting. It’s those little moments—everyone leaning over the skillet, swapping toppings—that make this a recipe I reach for again and again.
My favorite part is the ease of customization—one week I added pickled jalapeños and lime zest for brightness, and the family declared it a new favorite. Another time I swapped in pepper jack and a smear of salsa for a Tex-Mex twist. These small changes keep the concept fresh while relying on the same quick method.
Store leftover filling separately from tortillas when possible: the aioli will soak into the tortilla if stored assembled, making them soft. Keep the filling in an airtight container in the refrigerator for up to 24 hours. Cooked wraps can be refrigerated for up to 3 days; to reheat without turning them soggy, warm in a skillet over medium-low heat for a few minutes per side or use a toaster oven at 350°F until warmed through. For freezing, wrap individually in plastic wrap and foil, then place in a freezer-safe bag for up to 2 months; reheat from frozen in a preheated oven for best texture.
Short on aioli? Mix 1/2 cup mayonnaise with 1 small minced garlic clove and 1 teaspoon lemon juice to mimic garlic aioli. For a dairy-free option, use vegan mayonnaise and dairy-free shredded cheese; note that melt and texture will differ slightly. Swap shredded chicken for shredded rotisserie turkey or canned chicken in a pinch—drain well. Use whole-wheat or gluten-free tortillas for dietary needs; corn tortillas can be used but are more fragile and benefit from warming to increase pliability before folding.
Serve these wraps with a crisp green salad, roasted sweet potato wedges, or a slaw for contrast. For dipping, offer extra aioli, ranch, or a simple salsa verde. Garnish with chopped fresh herbs like cilantro or parsley and a squeeze of lemon to brighten the richness. For a brunch twist, serve alongside a light tomato and cucumber salad and a steaming hot cup of coffee.
Handheld filled flatbreads are a universal comfort food—this particular combination of garlic aioli and cheddar inside a flour tortilla reflects a modern, Americanized approach to fusion comfort food. Flour tortillas originated in Mexico but have been adapted in countless ways across North America. Using aioli and sharp cheddar adds Mediterranean and European flavor influences to a Latin staple, showing how simple pantry ingredients create cross-cultural dishes that feel both familiar and new.
In summer, add crisp, seasonal ingredients like corn kernels, diced tomatoes, or thinly sliced summer squash for brightness and crunch. In fall and winter, fold in sautéed mushrooms or caramelized onions for depth and heartiness. For holiday gatherings, add cranberry chutney and swap cheddar for a milder melting cheese to create a festive handheld that pairs well with roasted vegetables.
Make the filling ahead and portion into individual containers for grab-and-go lunches—assemble and grill the wraps when you’re ready to eat. Use silicone muffin tins or small containers to portion cheese into 1/4-cup portions so assembly is fast during busy mornings. If packing for work or school, store wraps cold and provide a small thermos with warm stock or soup for a complete meal experience.
These Cheesy Garlic Chicken Wraps are a dependable, cozy choice for any weeknight and a great canvas for creativity. I hope they become one of your go-to quick meals—tweak fillings, try different cheeses, and make them your own. There’s joy in a simple, well-made wrap shared at the table.
If using pre-shredded cheese, give it a quick pulse in a food processor to refresh the texture for better melting.
Press the wrap gently with a spatula during grilling to ensure even browning and better cheese melt.
Let the assembled wrap rest 30–60 seconds after cooking before slicing to prevent the filling from spilling out.
If the cheese isn’t melting quickly, reduce heat and cover the skillet for 30–60 seconds to trap steam and heat.
This nourishing cheesy garlic chicken wraps recipe is sure to be a staple in your kitchen. Enjoy every moist, high protein slice — it is perfect for breakfast or as a wholesome snack any time.
This Cheesy Garlic Chicken Wraps recipe makes perfectly juicy, tender, and flavorful steak every time! Serve with potatoes and a side salad for an unforgettable dinner in under 30 minutes.
In a medium bowl, combine 2 cups shredded cooked chicken with 1/2 cup garlic aioli. Fold until evenly coated and season with salt and pepper to taste. Optionally stir in chopped herbs for freshness.
Lay out four large tortillas. Divide the chicken mixture among them, placing the filling slightly off-center. Sprinkle approximately 1/4 cup shredded cheddar over each portion to ensure even melting.
Fold the bottom edge up over the filling, tuck both sides in, then roll away from you to form a tight seam. Press lightly to compact and prevent leaks during grilling.
Heat a skillet over medium heat with 1 tablespoon oil or butter. Place wraps seam-side down and cook 2–3 minutes per side until golden and cheese is melted. Press gently with a spatula for even contact with the pan.
Transfer to a cutting board and rest 1 minute. Slice diagonally and serve warm with optional dips such as extra aioli, salsa, or a crisp salad.
Last Step: Please leave a rating and comment letting us know how you liked this recipe! This helps our business to thrive and continue providing free, high-quality recipes for you.
Leave a comment & rating below or tag
@cozycookscorner on social media!
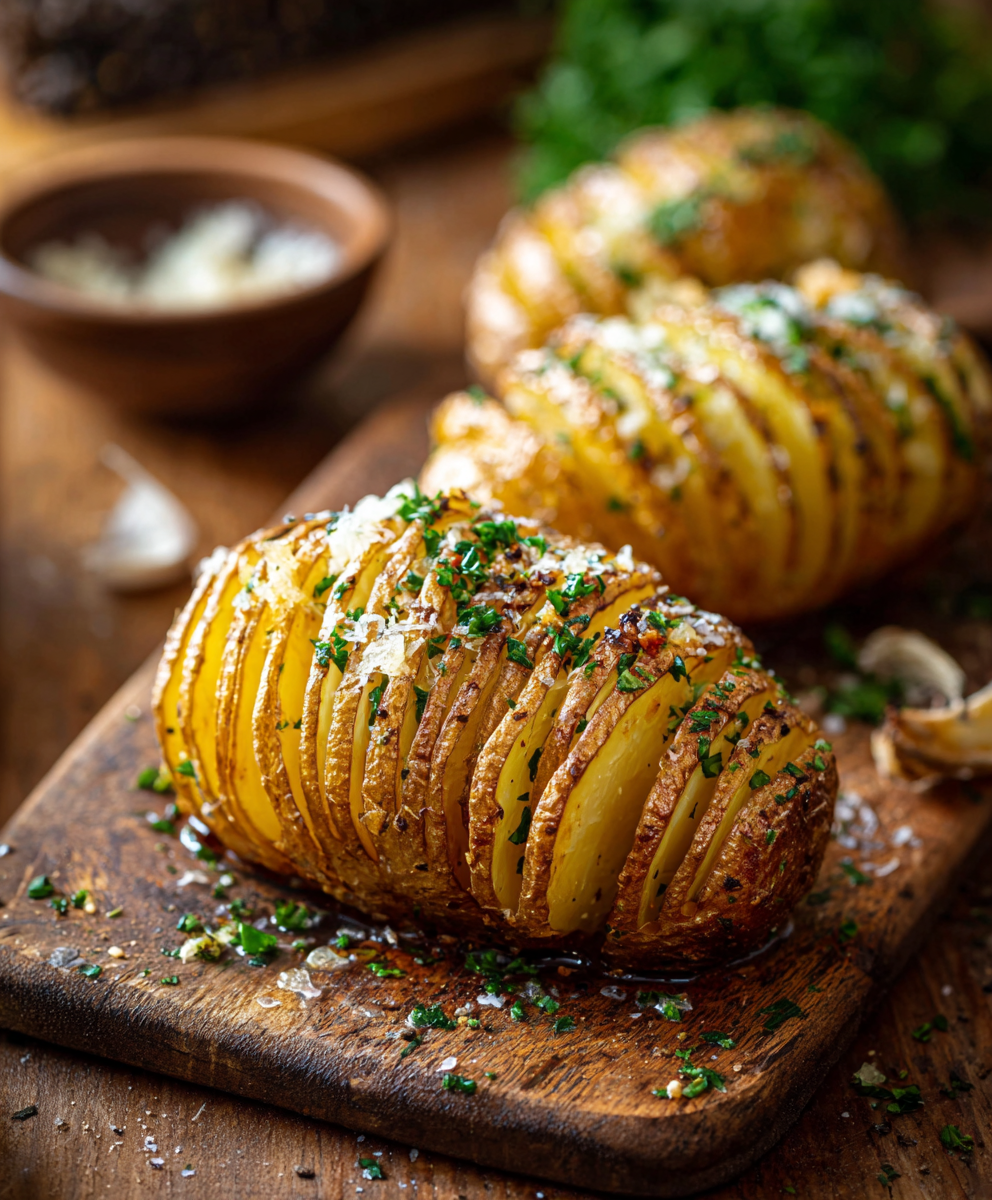
Thinly sliced, buttery, and golden-brown Hasselback potatoes—an easy, show-stopping side that crisps on the outside and stays tender inside.
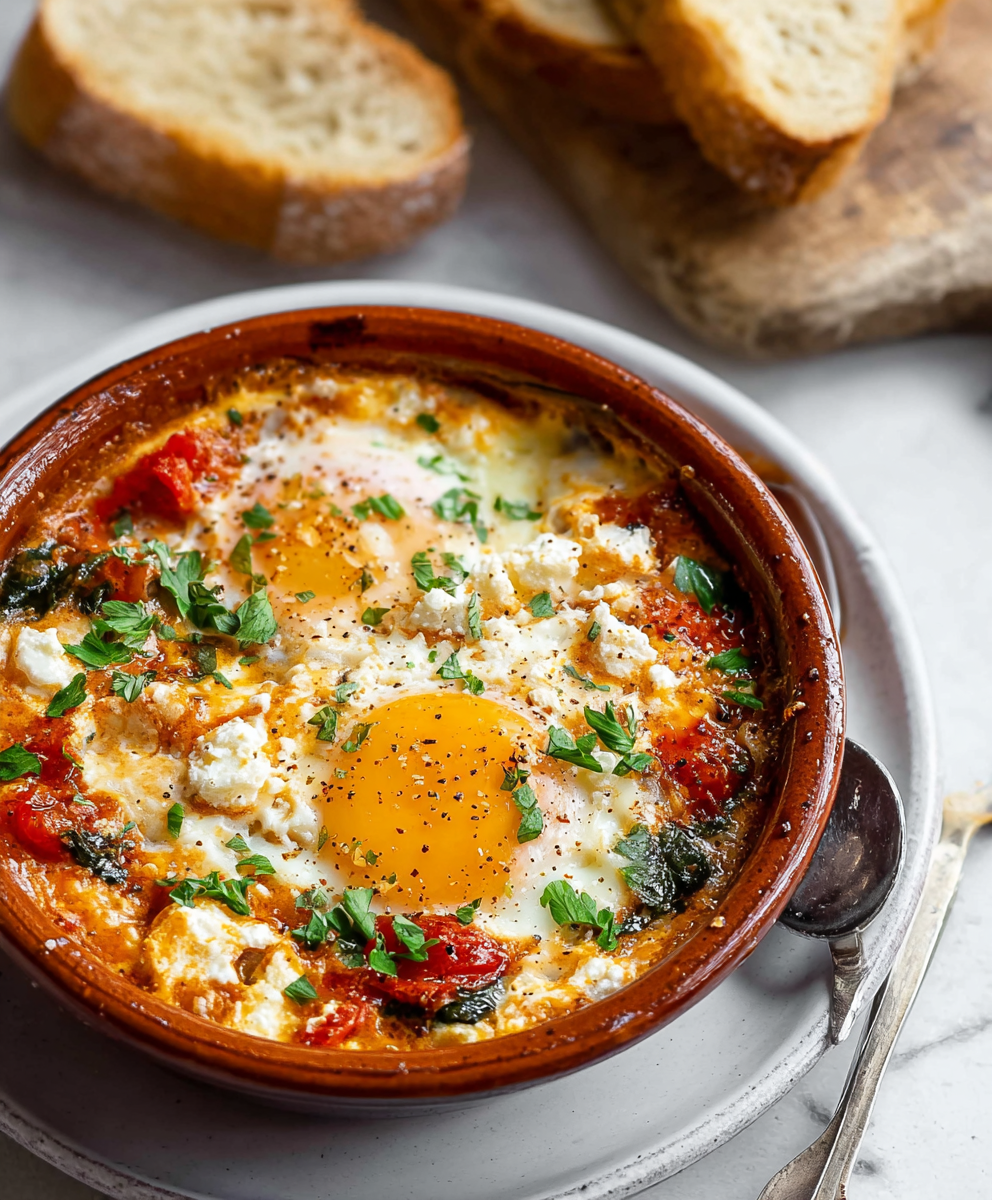
A vibrant oven baked dish of roasted tomatoes, tender feta, wilted spinach and baked eggs. Bright, tangy and perfect for breakfast or brunch with crusty bread.
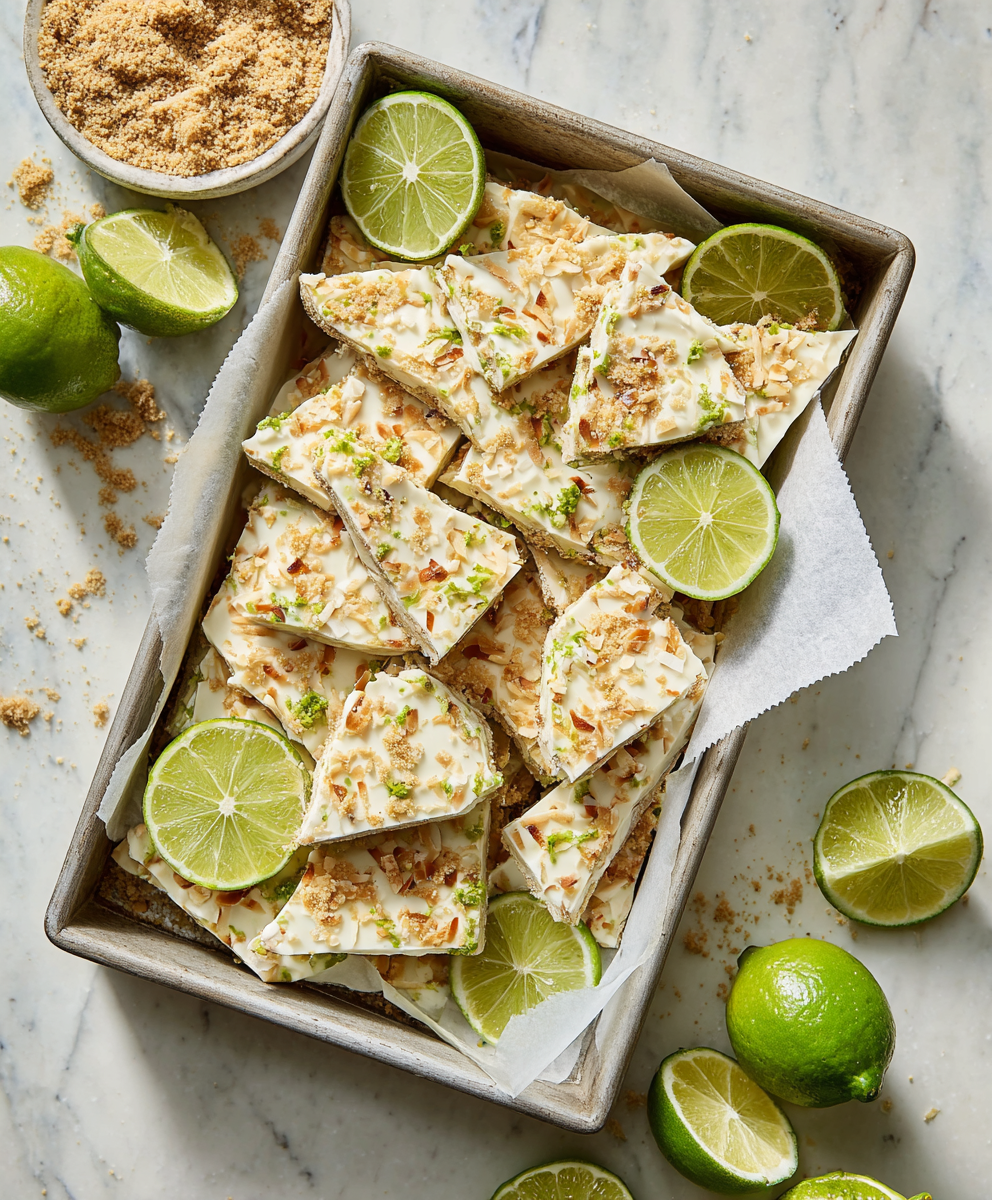
A bright, protein-packed frozen treat that captures the tart-sweet charm of key lime pie in a simple yogurt bark — perfect for hot days, make-ahead snacks, and gluten-free diets.
Leave a comment & rating below or tag @cozycookscorner on social media!
Enjoyed this recipe? Share it with friends and family, and don't forget to leave a review!
This recipe looks amazing! Can't wait to try it.
Comments are stored locally in your browser. Server comments are displayed alongside your local comments.

Join to receive our email series which contains a round-up of some of our quick and easy family favorite recipes.