>>
30-MINUTE MEALS! Get the email series now →


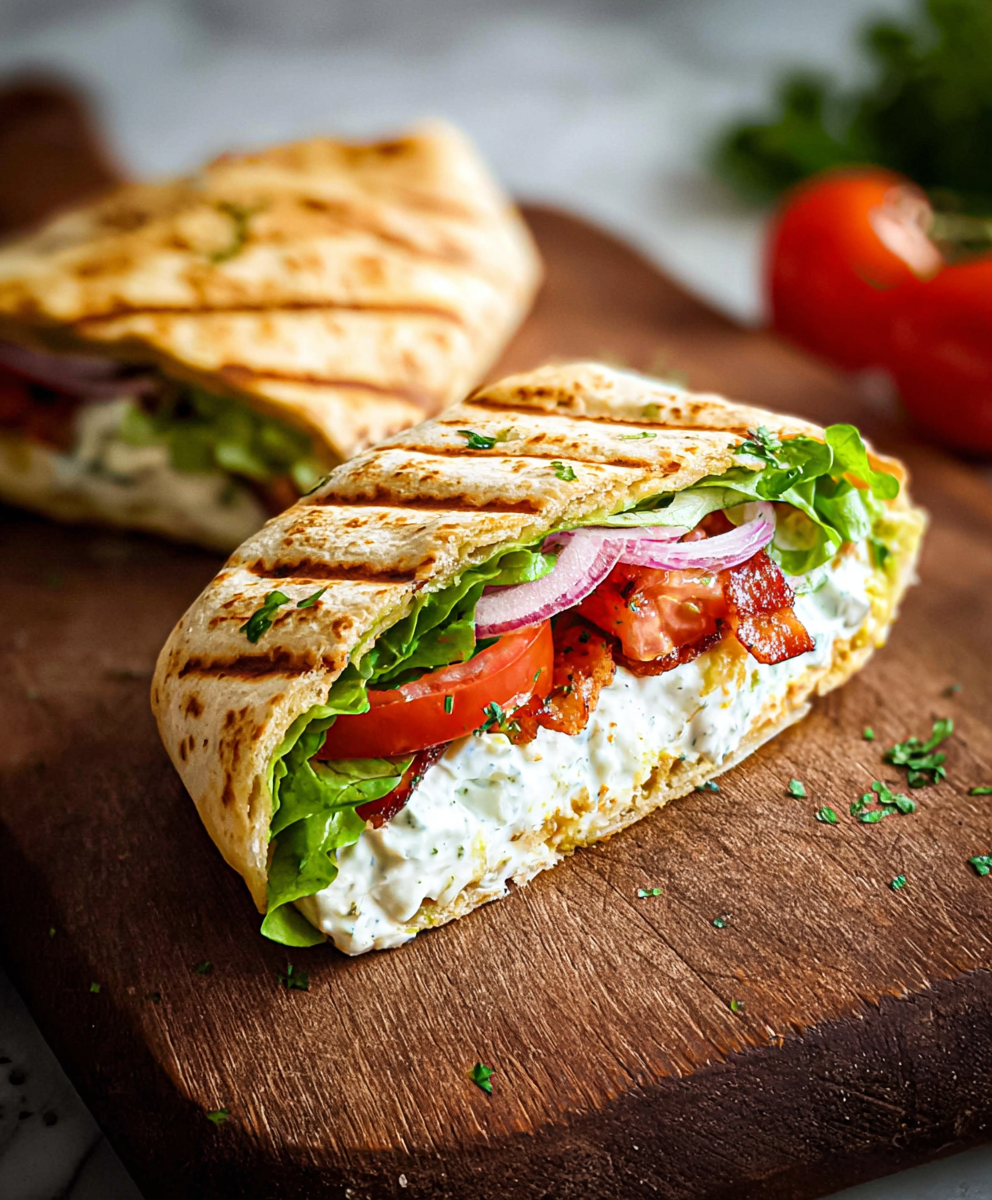
Light, protein-packed wraps made from cottage cheese, eggs, and Parmesan — a quick low-carb alternative to tortillas that toasts and holds fillings beautifully.
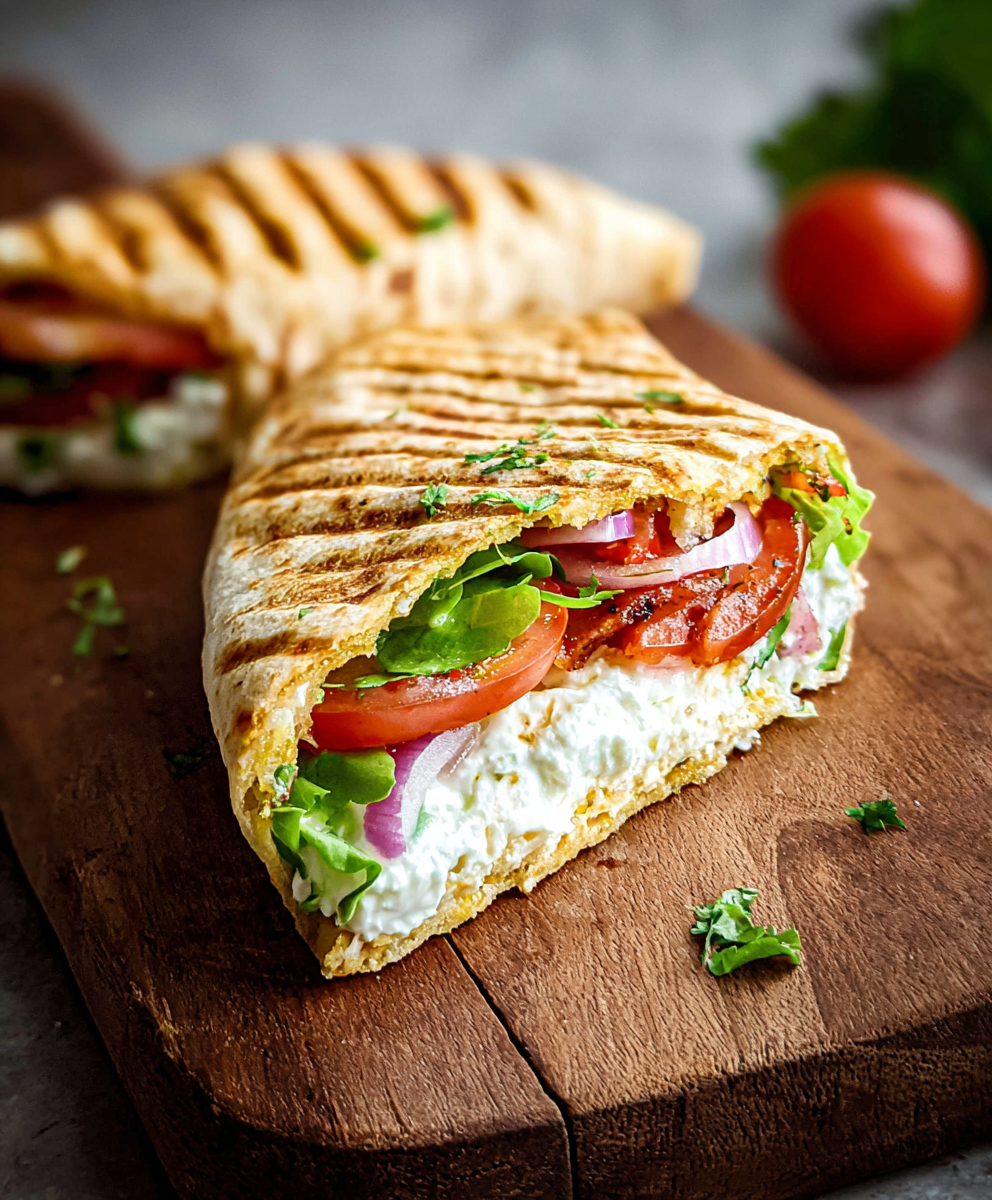
This simple cottage cheese wrap has become my go-to when I want something light, satisfying, and surprisingly versatile. I discovered this combination on a busy weeknight when I had pantry staples and a craving for a handheld lunch that wouldn't leave me sluggish. The batter—just cottage cheese, eggs, Parmesan, and a touch of seasoning—blends into a silky custard that bakes into a pliable, crepe-like sheet. It’s tender at the edges and set in the center, with a gentle nutty note from the Parmesan that carries through every bite.
I first made these to replace store-bought wraps for a family picnic. My picky teenager loved that they could load theirs with hummus and arugula, while my partner used his as a base for leftover roasted vegetables and a smear of pesto. The texture is the real surprise: thin enough to roll without cracking if cooled properly, but substantial enough to hold a generous filling. Because the recipe uses full-fat cottage cheese and eggs, the wraps are rich in protein and have a pleasant mouthfeel without needing flour or complex ingredients.
In my experience, the family reaction is always positive: everyone appreciates the homemade touch and the ability to customize. After a few tries I learned to thinly spread the batter and allow the wraps to cool completely on the parchment; that firming step makes rolling much easier and prevents tearing.

My favorite aspect is the adaptability—I've swapped in a tablespoon of lemon zest for a fresh lift or stirred in chopped sun-dried tomatoes for a savory twist. At a fall potluck I served a batch with roasted pepper and basil filling and ended up sharing the method with three neighbors. Seeing this simple custard become a stable at so many tables is what keeps me reaching for this recipe.
To keep wraps fresh, stack cooled sheets with parchment between layers and press gently to remove air before placing them in an airtight container. Refrigerate for up to 4 days; to freeze, individually wrap each portion tightly in plastic wrap and place in a freezer bag for up to 3 months. Thaw overnight in the refrigerator and reheat briefly in a low oven or skillet to restore pliability. Avoid microwaving too long—overheating can make the texture rubbery. When reheating, a light spray of olive oil or a quick pan sear helps revive surface color and flavor.
If you prefer a drier profile, use low-fat cottage cheese but expect slightly less richness and a firmer texture; add 1 tbsp olive oil to compensate. For a cheesier wrap, swap 2 tbsp of Parmesan for grated Pecorino Romano or sharp cheddar—flavors will intensify. Omit garlic powder and add 1 tsp minced fresh garlic if you like fresher aromatics, but patting fresh garlic dry prevents excess moisture. For herb-forward wraps, fold in 1–2 tbsp chopped fresh parsley, basil, or chives after blending.
Serve these wraps as a portable lunch with crunchy slaw, roasted pepper strips, or slices of avocado. For brunch, fill with smoked salmon, crème fraîche, capers, and dill. They also make excellent appetizers: cut into small rolls and secure with toothpicks, or warm and place under the broiler briefly with melted cheese and spinach for an open-faced snack. Pair with a bright green salad or a bowl of tomato soup for a comforting, balanced meal.
While not tied to a single traditional cuisine, this technique follows a long history of pan- and oven-baked egg-and-dairy sheets used as wraps or crepes in various kitchens. Using cottage cheese as the primary dairy gives a cottage-style rusticity reminiscent of Eastern European dairy preparations, but the addition of Parmesan and Italian seasoning nudges the flavor profile toward Mediterranean influences. This recipe represents modern home cooking—transforming staple ingredients into a functional, portable format.
Spring and summer call for bright fillings—radish, cucumber, herbs and young greens—while fall and winter are perfect for roasted root vegetables, caramelized onions, and warm cheeses. Add 1–2 tbsp pumpkin purée and 1/2 tsp sage for an autumnal take. For holidays, make a batch with sun-dried tomatoes and chopped rosemary to accompany festive spreads. The batter itself remains the same—alter fillings by season for varied menus.
Make a double batch and freeze individual wraps for grab-and-go lunches. Assemble fillings the night before to speed morning assembly. Keep wetter ingredients like tomatoes or pickles separate and add them just before serving to prevent sogginess. Store fillings in shallow containers to cool quickly and maintain freshness; use silicone food-saver bags to compress wraps and save space in the fridge.
Final thought: These cottage cheese wraps are one of those small innovations that make weekday meals more interesting. They’re flexible, nutritious, and unexpectedly elegant for how little effort they require—give them a go and make them your own with the fillings you love.
Use room-temperature eggs to help the batter emulsify smoothly when blending.
Drain very wet cottage cheese briefly in a sieve to avoid excess moisture in the batter.
Spread the batter thinly and evenly; aim for consistent thickness to ensure uniform baking.
Cool the baked sheet completely before peeling from parchment to prevent tearing.
If reheating, warm gently in a skillet rather than the microwave to preserve texture.
This nourishing cottage cheese wraps recipe is sure to be a staple in your kitchen. Enjoy every moist, high protein slice — it is perfect for breakfast or as a wholesome snack any time.
Yes. Allow the baked sheet to cool completely before peeling; cooling firms the sheet and prevents tearing.
Freeze wrapped portions up to 3 months; thaw overnight in the refrigerator and reheat gently in a skillet or oven.
This Cottage Cheese Wraps recipe makes perfectly juicy, tender, and flavorful steak every time! Serve with potatoes and a side salad for an unforgettable dinner in under 30 minutes.
Preheat oven to 350°F (175°C). Line a rimmed baking sheet with parchment paper to ensure easy removal after baking.
Combine cottage cheese, eggs, grated Parmesan, garlic powder, and Italian seasoning in a blender or food processor. Blend for about 60 seconds until the mixture is silky and homogeneous.
Pour the blended batter onto the prepared parchment. Use a silicone spatula to spread it into a thin, even rectangle, roughly 10x12 inches, without gaps.
Bake in the center of the oven for 30–35 minutes, or until the top is lightly golden and the center is set with no jiggle.
Let the baked sheet cool completely on the tray for 20–30 minutes so it firms up. Carefully peel off the parchment and transfer to a cutting board.
Cut into two sections. Fill with preferred fillings—greens, roasted vegetables, spreads, or proteins—and roll or fold to serve.
Last Step: Please leave a rating and comment letting us know how you liked this recipe! This helps our business to thrive and continue providing free, high-quality recipes for you.
Leave a comment & rating below or tag
@cozycookscorner on social media!
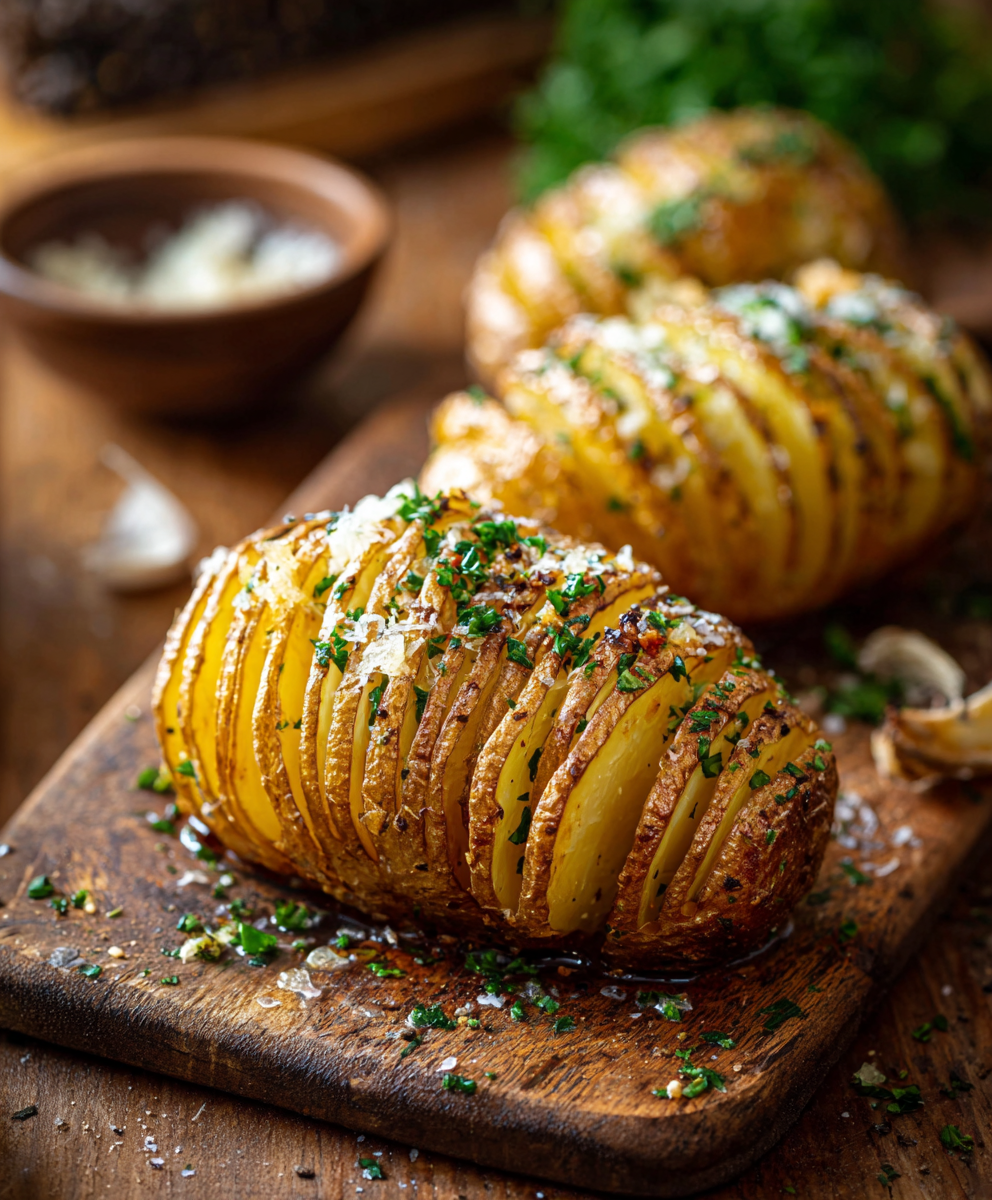
Thinly sliced, buttery, and golden-brown Hasselback potatoes—an easy, show-stopping side that crisps on the outside and stays tender inside.
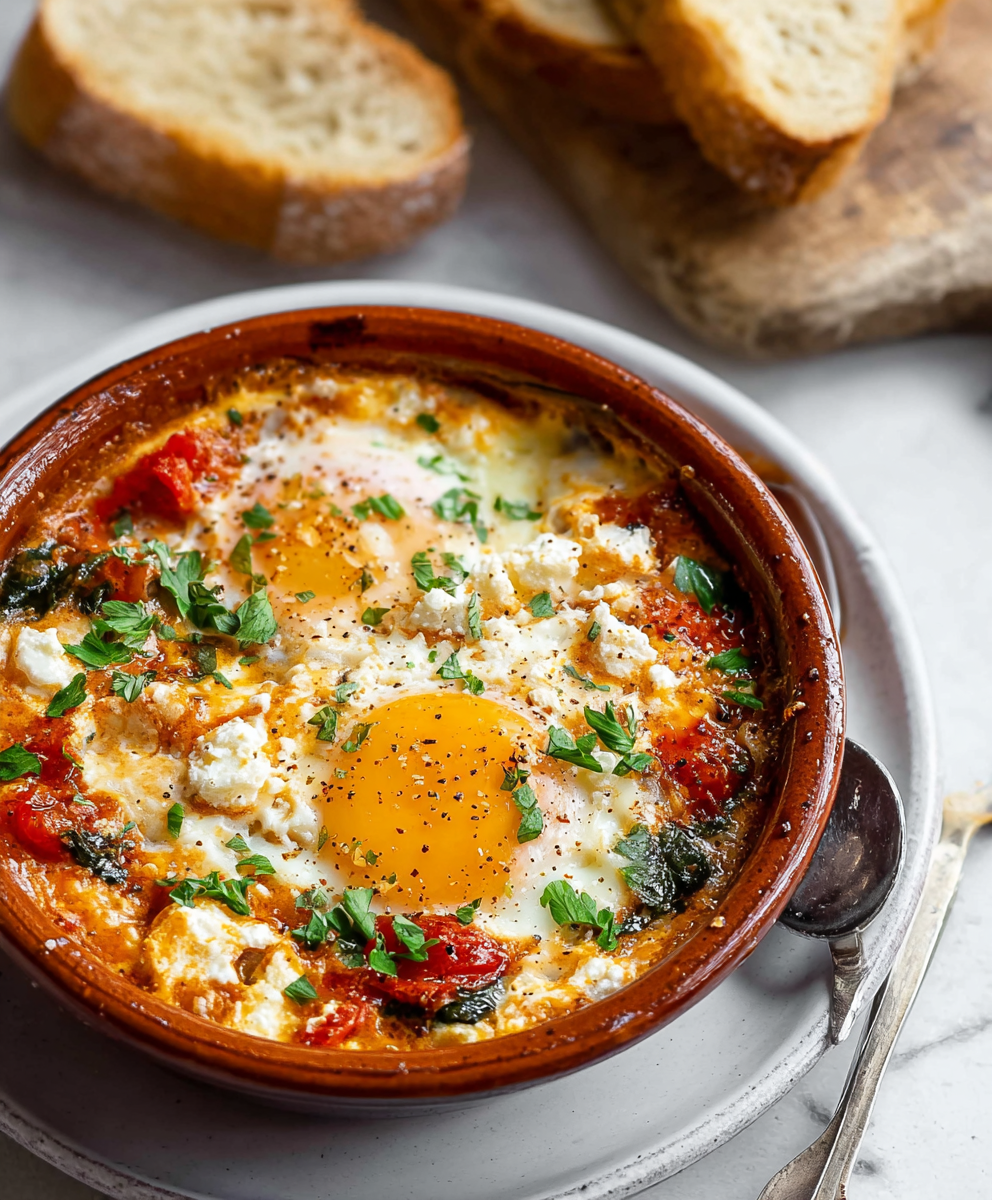
A vibrant oven baked dish of roasted tomatoes, tender feta, wilted spinach and baked eggs. Bright, tangy and perfect for breakfast or brunch with crusty bread.

A bright, protein-packed frozen treat that captures the tart-sweet charm of key lime pie in a simple yogurt bark — perfect for hot days, make-ahead snacks, and gluten-free diets.
Leave a comment & rating below or tag @cozycookscorner on social media!
Enjoyed this recipe? Share it with friends and family, and don't forget to leave a review!
This recipe looks amazing! Can't wait to try it.
Comments are stored locally in your browser. Server comments are displayed alongside your local comments.

Join to receive our email series which contains a round-up of some of our quick and easy family favorite recipes.